Tuesday, December 19, 2006

Depth Perception and the wave


Mike Jorgenson

I tried to do a little analysis of the frequencies in the waveforms in relationship to the sense of percieved distance/depth in the recording. First, a few disclaimers. 1) I'm not 100% sure I'm analyzing the frequencies right. 2) The sounds I've chosen are based on what I feel to be good (or poor also) examples of depth. That said, here we go.
I looked at the frequencies using the spectral frequency view in Adobe Audition. I took tests 03-01, 03-14, 08-3, and 10-11 to try to compare a few things. First, I took test 03-01 and 03-14. These clips are from the same test and the particular clicks I compared are the same click. In addition, I chose 03-14 because it's position was not too far off of the 03-01 position. So, in theory they should sound generally the same. However, they are from different rigs. I found a few things. First, I thought in general the 03-01 sounded like there was a little more distance to the clicks. From just hearing it I thought that one of the major differences was the middle and background noise that affected this depth perception. It seems that the brighter the middle and background tones the closer the object is perceived to be. Comparing the two waveforms this seemed to be confirmed. (This sound is the 03-01 rig click 2x, followed by the 03-14 rig click 2x). The 03-14 rig has much more green and orange in this picture, signifying higher energy sound, in the 4k-10k frequency range. In comparison to the other tests I looked at it seems that the tests that sounded closer (08-03 and 10-11) had more frequency response in this same range. The lower frequencies seemed to roll off in the decay whereas in the 03 tests they did not. They seemed to remain consistent from about 6khz down. In the 08 and 10 tests you can visually see this as the green dissipates bulges in the middle (looking vertically at the click) and then sucks in at the lower frequencies. However, there is also something else to it. Looking horizontally across a small range of frequencies (say roughly one 'spike' horizontally) there are different shapes produced by the high energy and low energy colors through the decay. For example, the 03-01 test has a fat, thin base on the left that spikes fairly quickly (see pic). Test 08-03 has a more bulbous base with only a small spike. And test 10-11 has a fairly consistent slope to it. I viewed test 08-03 as having better depth percieved than test 10-11 and worse then 03-01. So it seems that the more gradual the slope of the energy, the closer the sound appears to be.
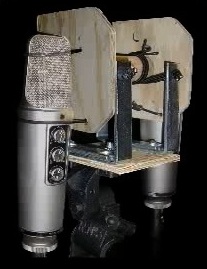
The rigs that I have chosen to look at actually says something about this I think. Test 03-01 is one of the tests on the dowel with only a simple baffle. Test 08-03 is a double boundary. Test 10-11 is a triple boundary. It seems that the more boundaries you have, the closer the sound is percieved to be at. Like I said though, I'm no expert. But this is what I found to be true.

Stereo vs. Mono. Is it worth it? By Anna Krutzik

For my test of different variables I chose to see if I could hear any difference between the three tests I had chosen as a good representation of stereo when I put them in mono. To my ears, all of the original tests sounded basically the same, with only very minimal variations on each other. While I could hear the stereo effects in the localization of the dings, not much else seemed to really make it "stereo" sounding. And the dings were sort of tempermental, you could tell the direction of some, but not completely all of them.

So, to test my ears, I compared the same tests in both stereo and mono and noticed an immediate difference between the two. In creating a sense of space, the stereo versions win hands down, the mono versions sounding flat in comparison. Of course, hearing the sound surrounding your ears (in stereo) rather than being duplicated into both ears the same (in mono) creates the feeling of actually standing in the room because it mirrors how a person would actually hear, each ear picking up on different sounds based on their positioning and putting them together to create a composite of the space.

As for the localization of the dings in mono vs. stereo, I didn't hear as much of a difference as I would have expected. For whatever reason, I could consistently hear more difference in the location of the dings between 1-4 in the stereo recording. I'm not quite sure if this is my own mind just subconsciously interperating the difference between hearing the dings from the left to the right side as thinking that the right side dings are more localized. Or if there is a specific technical reason for this. So in the mono versions of the tests, I didn't notice that much of a difference in hearing the dings on the left side.

I thought that maybe listening to the recordings in mono but still viewing the animations which illustrate where the ding is coming from in the clock positioning would fool my mind into thinking that I heard it the same as in stereo. And while it did a little bit, there was still an obvious difference when watching the animation and listening to the stereo version.

All in all, I now appreciate much more fully the value of stereo sound recordings and their ability to recreate and place the listener in the space of the original recording.

I recommend listening to the mono versions first and then to their stereo counterparts immediately after to get the full effect that the stereo brings.

Mono Versions
T4-07
T6-04
T9-02

Stereo Versions
T4-07
T6-04
T9-02

Monday, December 18, 2006

Holly Moore: A Few of My Favorite Things

T3-7

The localization exhibited in the parallel boundary rig is crisp and distinct. When compared to other rigs and positions in the same test, such as position 3 using a front-facing rig with 21" spread and baffle, this one clearly illustrates where the sounds are projected from. It is extremely difficult to distinguish the directional value of the sounds with the baffle in the third position. The 8,9,3,4 positions clearly reveal the area in which they are coming. The distinct reverberations of the dings clarify their position in the space while positions 10,11,12,1,2 highlight the clarity of the EM158 mics without clearly distinguishing the direction in which the sounds are coming.

The difference in depth between the 8,9,3,4 positions compared to the 10,11,12,1,2 positions is great. When used on a parallel boundary rig, these mics impressively exemplify depth within the space. This rig differenciates the closeness of positions 10,11,12,1,2 to the distance of positions 8,9,3,4 much more than the second rig I chose, the pseudo SASS flush mounted with the same 3" inset. The depth is not greater than the triple boundary rigs such as the 6" separated triple boundary rig at position 11.

The architechtural value of this rig is not as great as my other two picks. There is a small amount of displace in the sounds, but it fails to clearly differentiate the open space used to test the rigs.

T4-1

I found the pseudo SASS in the first position to be incredibly clear and crisp with every ding in each direction. This clarity, however, becomes problematic when judging its localization because the sounds tend to overlap in all positions making it difficult to differentiate the direction in which the ding is coming. Each ding appears very close to the position of the rig, causing problems with depth as well. There is greater depth between positions 11 and 1-4, however. The offset of the positioning highlights the architechtural value of the space.

The pseudo SASS offers great architectural value to the open space in which this test took place. The echo provided with the greater distance of the dings in the latter positions sheds light on the proximity of the walls according to the first position of the rig. The tapering off of the dings is a great effect for spacial recording.

T8-4

This rig and EM158 mics, boundary 160 degree rear facing with 2.5" inset and 11" separation, was not my initial pick, but grew on me upon further listening. I came to the conclusion that this rig highlights localization, depth and architectural value more than my other two picks. When comparing this with the other two, this set up promotes the area in which the dings are occurring while pronouncing spacial value with its greater depth. There is a minute echo at each position, which exposes the warehouse space used. The area is slightly flattened by the other rig set ups while the direction of the dings is less obvious than the fourth position boundary rig.

Andy Chaney, Pieper Final Post

note:all recordings have been slowed down to 5% of their original speed

What Rob and myself talked about in terms of what to do for the final analysis revolved around the fact that I had to slow down all of the recordings so that I could hear them (I'm hearing impaired, mostly in
the high frequencies). What this did, then, was created some interesting conditions in the sound recordings, such as the large amounts of sustain, which I gauged to be the most accurate aspect of what kind of space was coming across in the recording. Thus, Rob suggested to do a test with several sonograms of the same ding but from different positions, in order to sort of study the waveform and types of frequences each rig was picking up, as well as looking at how each frequency sustained with the rig. Below, you can see three of the tests that I thought really had a nice amount of sustain, which was test 3. I chose station 3 (my own), 7, and 10, and did sonograms on those stations. If you look below, you can see each rig, and the resulting sonogram that each had, as well as listening to the recording, too.

Picture of Test 3, Station 3 Rig compared against the Sonogram For Test 3, Station 3. 12 O'Clock Ding.


Listen to the slowed down recording of Test 3, Station 3
(Click on "download full URL" to download the mp4 file)


Picture of the Test 3, Station 7 rig, compared to the Sonogram for Test 3, Station 7. 12 O'Clock


Listen to the slowed down recording from Test 3, station 7


Picture of the Test 3, Station 10 Rig compared to the Sonogram for Test 3, Station 10, 12 O'Clock Ding


Listen to the slowed down recording from Test 3, Station 10

Results:
Where this test seems to hold the most promise is in terms of how the rigs performed according to what they were showing in terms of the frequency response. A quick note about the sonograms: what they represent is each frequency, high and low, and how long they were still showing a response. The higher up on the chart, the higher the frequency, as you can see on the sonograms. In terms of the results of this test, #3 and #7 performed much better than #10 did. As you can see on the sonogram above, #3 and #7 had very good responses across all of the frequencies, and they seemed to sustain much better, judging by the longer responses than on #10. #10 had very "thin" responses even in the initial part of the sonogram, I don't know if this meant that the sounds were not picked up very well by the microphone, but looking at the sonogram, they don't seem as strong as the ones in #3 and #7. I noticed that in #3, some of the mid-frequencies seemed to hold almost until the end, and the higher frequencies had a nice response. This sort of feels consistent with my initial observations about why I liked those recordings in the first place, because of the interesting sustain that they captured. I described it as feeling as if the sounds were being held by the microphone and the rig even after the initial sounds had passed. It gave the room a weird localization. #7 had similar characteristics in its sonogram as #3 did, although the sonogram got cut off a little bit at the end during the transfer process to blogger. #10 just didn't seem to sustain as well as the other ones did, and perhaps that was indicative of the rig type, where the other two were parallel boundaries and probably had a little bit of the sound being contained, or bouncing off the rigs, #10 did not have the same rig characteristics, and that seems to be reflected in the test. Also, I didn't notice any specific variations in this test because of it, but I intentionally chose ones that had a baffle, or that didn't have a baffle, so that I could contrast the parallel boundary sonograms with a baffle, and a parallel boundary without a baffle, etc. And then a rig without the parallel boundary, but with a baffle. However, I couldn't really discern any specific results in terms of the baffle or no baffle, I thought it might show a different type of frequency sustain, but it wasn't really reflected in the test.

Saturday, December 16, 2006

Scott Gara's Favorite Mic Rigs

When listening to the plethora of different recordings that we had to go through I decided to look particularly for the specifics of microphones that did a good job of picking up strikes from the 11 o'clock position to the 1 o'clock position. Most of the tests that we recorded had very muddy results in these particular positions. They seemed to blend together as one sound instead of being three very distinctly different sounds. I have picked here four tests that do the opposite of most of the "muddy middle" recordings that we have. In attempting to explain what sets these rigs apart from the other rigs that we have I think it would only be fair to point out some of the other obstacles that we had when recording. I don’t think that it was only a particular rig that was at fault but also the space and the direction of the mics which may be equally to blame for the 3 middle positions blending together.

For Test #03 Sta #2 Anthony C. Front facing Baffle with 21" spread https://pantherfile.uwm.edu/smgara/public/media/T03-02.mov?uniq=aim1fs
In Anthony's rig I think that it is interesting to point out that this was the only rig I found that was front facing microphones. I think that it picked up good distinction of sounds due to the fact that it had a baffle and such a wide separation on the dowel. I picked this one not only for its great separation of positions 11-1 but also for its stereo imaging. Every sound has a distinctly different spot when one listens to it.

For Test # 07 Sta #4 Josh Boundary Mic 160 degrees rear facing EM158 - 9" separation https://pantherfile.uwm.edu/smgara/public/media/T07-04.mov?uniq=aim1fy The first of Josh's tests I found the 12 o’clock sound to be a dull sort of noise. Yet it was still able to separate itself from the surround two positions. I think 12 o’clock had a dull noise for a number of different reasons. First the microphones are rear facing so they will not pick up the strong sound that may have been directly in front of them because they are picking up the echo or the bounce back from the wall. I did find it amazing t that they are able to pick up bounce back and separate between these three different areas. Again the separation of the sounds in relation to the separation of microphones comes into play.

For Test # 08 Sta #4 - Josh Boundry Mic 160 degrees- rear- EM158 - 11" separation https://pantherfile.uwm.edu/smgara/public/media/T08-04.mov?uniq=aim1g4 On the next test Josh stays in the same spot only separates the mics more. Some of the problems still occur at the 12 O'clock sounding. Yet the separation of 11 and 1 is greater. I think that is due to the separation of the microphones.

For Test #09 Sta #14- Rob -Side Facing Shure 183's Omni Mics 9 " Separation https://pantherfile.uwm.edu/smgara/public/media/T09-14.mov?uniq=aim1ga
The last test I have is Rob's Shure headphone Mics. They are the only side facing that I have and I think that they did a very nice job in picking up sounds. Again you lose some middle ground in getting a dull 12 o’clock sound but I think that the separation between the top three is the best out of all the rigs. Part of the reason that I feel that way about these is because they have great stereo imaging due to the fact that they separated like the human ears.


Wednesday, December 13, 2006

Jose's observations re: pieper barn tests

Starting with the specific characteristics of : localization, tonal quality, and material/spatial signatures (ambience, echoes, depth), i liked:


the #16 double boundary rig with the Rodes mics seemed to consistently stand out in many of the tests - esp. in terms of tonal quality. the dings seemed fuller, richer, wetter on the tests recorded w/this rig.


the T9-2 and T10-2 ORTF rig also stood out in some of these areas, esp. localization and tonal quality.


I also thought that many of the triple boundary rigs captured many of these characteristics well, although localization in the 8, 9, 3, and 4 positions seemed to be diminished - most likely due to the rear boundary.

Anthony Lopez, Pieper Plant Rig Favs

T4-10 Styro Head EM158 Omni Mics.

A) Perhaps I am being biased because the rig is fitted to a foam head, but, I think this rig does an excellence job of recreating localization for the human head. When I close my eyes, without looking at the graphic, each clink has a physical presence in my ears and is easily mapped out. Because the capsules are front facing they seem to favor 10-2 o’clock, which makes it harder for me to discern he location of these because the clinks seem pushed against you, whereas the 8,9,3,4 positions have a lot of space behind them allowing for more reverberation and imaging.
B) The clinks sound further away at 8, 3, and 4. And closer at 9, 10, and 11. At 12 the rig seems to have the correct depth. This is perhaps due to the 6” headspace on the foam head allowing the stereo image of the sound to reach both ears properly. At the other positions the opposite capsule becomes a victim of head shadow, something the human head experiences, which causes one ear/capsule to receive more sound sooner than the opposite one. However, one problem with this rig is that the human ears are actually A-B positioned, while the capsules are front facing.
C) This rig does an excellent job of mapping out the architecture of the space. When I listen to this I can pretty much visualize where every wall was. I know that 8 sounds much further away because there is a lot of dead space behind that area, with a wall much further from the “clinker” than any other position. From 9-12 there is a wall directly behind the clinker, 9 sounds like it is further from this wall though, and 11 sounds very sharp, like the clinker was standing in corner with all the sound being collected and focused before being bounced back. This person was also standing near the car which could have being reflecting a lot of sound. 12 o’clock sounds perfect. The capsules are facing forward and the clinker is in front of a large wall, so the sound is thrown right back. 1-4 positions mimic the 8-11, but with less volume, perhaps because the clinkers used less force, or because there was more space, particularly at 3 where there was a huge depression in the room where the loading dock was, this clink seems to travel for a while, perhaps the longest on this rig.


T6-14 Psuedo-SASS – 110 degrees EM158 Omni Mics 6” separation, Inset 2.5”

A) When compared to the Styro Head, this rig seems to have a less accurate localization. First of all, everything sounds somehow compressed and too immediate, while the styro head rig has much more room in it and picks up more reverberation. Also, at the 10-2 positions the space between the two angles on the SASS is felt. It seems to create a physical space between the two capsules.
B) The only position that seems to get a lot of depth with this rig is the 3 o’clock, which I am assuming will be the same for all tests because of the loading dock behind that position. Otherwise, everything else seems compressed, as if the clinks are half the distance from the rig. Perhaps this is what I was getting at with the localization; everything seems closer, so the clock positions seem accurate in that respect.
C) This rig does not seem to create an accurate picture of the space. The only position it somewhat recreates is the 3 o’clock. The differences in space and volume are subtler than the styro head creates. Again, this is because the SASS causes the clinks to have more volume and immediacy. This seems to compress the space and begins to make it sound like a perfectly square room with no impeding objects or depressions, except at the 3 position.
* I realize that this entry makes it seem as though I did not like the rig, however, I think it could be useful for compressing a space and getting more gain from a spacey area, which is why I chose it.


T5-3 Parallel Boundary Rig 1.5” Inset EM158 Mics.

A) This one sounds very similar to the styro head. As opposed to the SASS, this rig gives the clinks more space and a more realistic image of the clock positions. Although this rig seems mimic the human head (6” spacing), it does not create the “head shadow” stereo image that the stryo does. For example, sound from 9 seems to wrap around and reach the opposing capsule. Whereas the stryo creates a shadow to separate 9 from 3.
B) Although this rig has more depth than the SASS, it definitely has less than the stryo. In fact, the 3 position seems to have lost its depth from the loading dock space. This could be because the clinker may have clinked too hard or too sharply, because 8 and 9 still seem to have accurate depth.
C) Except for the 3 position this rig seems to draw the space accurately. Although it does have that slight “compressed” feel I mentioned in regards to the SASS, it has a much more accurate depth and localization. This seems particularly true at 9 and 8, the large space behind those clinkers is felt. The clinker at 9 sound like he is standing at the line where the closer wall and the car is. Half the clink seems to roll into the empty space where 8 is standing, and half seems to be reelected off of the closer wall where 10 is standing.